The First Few Milliseconds of an TLS 1.2 Connection
Intro
In 2009, Jeff Moser published an excellent article on the first few milliseconds of an HTTP request. It described in detail how TLS 1.0 connections are established, including a great description of RSA. We’ve attempted to build and adapt upon that article here by describing how the process works for a TLS 1.2 connection. As of January 2nd 2017, TLS 1.2 has roughly 83.2% adoption among top websites, so now is a great time to dive in.
The process of conecting via TLS 1.2 begins when the user attempts to navigate to a website. For this description, we are attempting to navigate to https://example.com/
TLS Layers
The TLS protocol is composed of several layers, which come together to form each request. Here are descriptions of the common layers
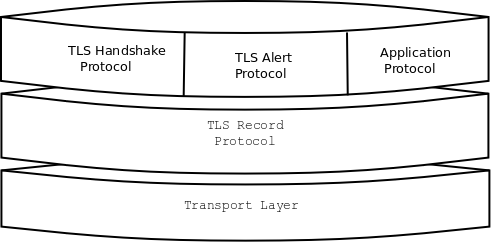
Transport Layer - The protocol over which TLS data is distributed. For HTTPS, this will be TCP. Needs only to be reliable (packet loss must be handled). Not a direct part of TLS.
Record Layer - The record layer handles sending/receiving TLS messages, including data fragmentation for packets, (optional and bad) compression, and encryption.
The next three are common protocols that operate within the body of the Record Layer. TLS extensions can specify additional protocols.
Handshake Protocol - Responsible for choosing a cipher suite, connection parameters, and coordinating a shared secret.
Alert Procotol - Used to communicate warnings and errors. The most common alerts are for an invalid server certificate or to signal the end of a TLS connection when the client exits.
Application Protocol - Raw higher-level application data transmitted by TLS. For us, this is HTTP.
Now, onto the first few milliseconds of a TLSv1.2 request!
Part 0: The Record Layer
Since the following packets will be wrapped in a Record Layer struct, it’s worth describing that here.
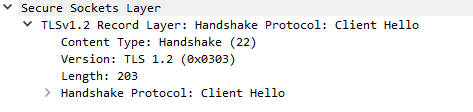
The record packet specifies the Content Type of the request, the TLS version, data length, and then the content data (in this image, a handshake clienthello).
Note that the version specified in the record layer is often different from that specified in the handshake. This is for compatibility with some old TLS/SSL servers. You will often see the version here specified as TLS 1.0 (0x0103, or SSL 3.0)
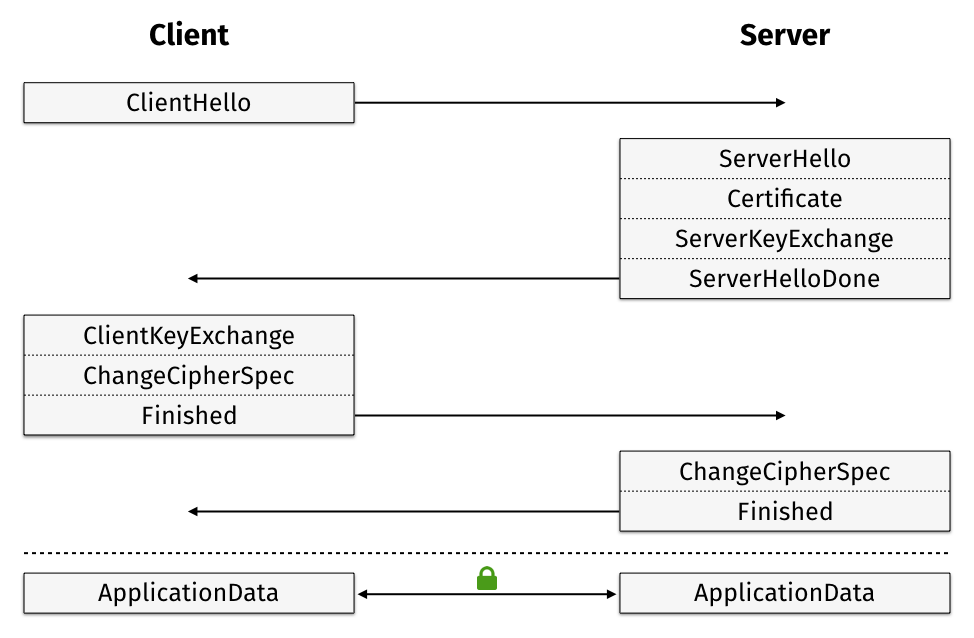
Part 1: Client Hello
Our web browser (Microsoft Edge 38.14393.0.0 on Windows 10) will begin the TLS 1.2 handshake with a ClientHello record.
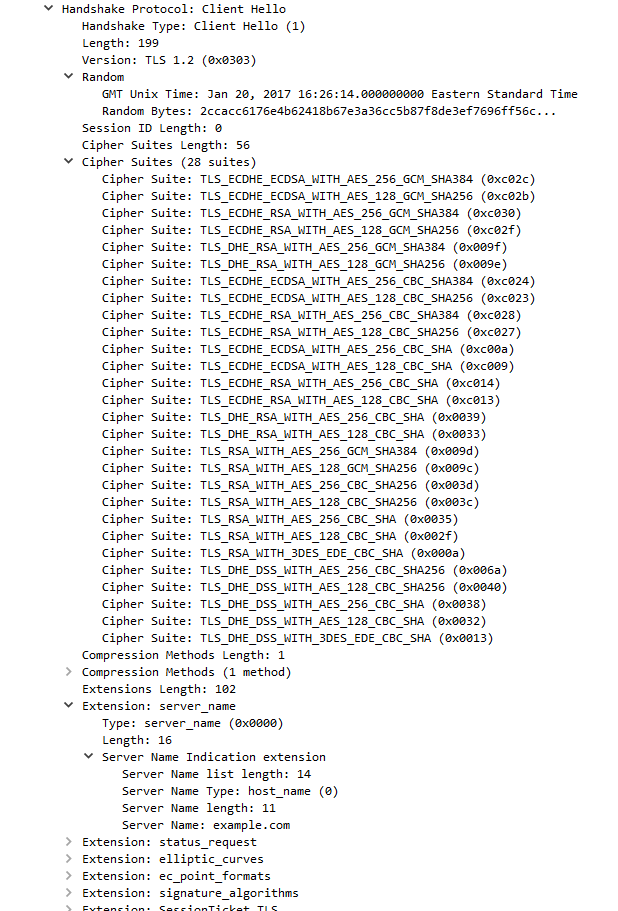
We can see several important fields here worth mentioning. First, the time (GMT seconds since midnight Jan 1, 1970) and random bytes are included. This will be used later in the protocol to generate our symmetric encryption key.
The client can send an optional session ID (not sent in this case) to quickly resume a previous TLS connection and skip portions of the TLS handshake.
Arguably the most important part of the ClientHello message is the list of cipher suites, which dictate the key exchange algorithm, bulk encryption algorithm (with key length), MAC, and a psuedo-random function. The list should be ordered by client preference. The collection of these choices is a “cipher suite”, and the server is responsible for choosing a secure one it supports, or return an error if it doesn’t support any.
The final field specified in the specification is for compression methods. However, secure clients will advertise that they do not support compression (by passing “null” as the only algorithm) to avoid the CRIME attack.
Finally, the ClientHello can have a number of different extensions. A common one is server_name, which specifies the hostname the connection is meant for, so webservers hosting multiple sites can present the correct certificate.
Server Hello
Once the server has processed our ClientHello, it will respond with a TLSv1.2 ServerHello message
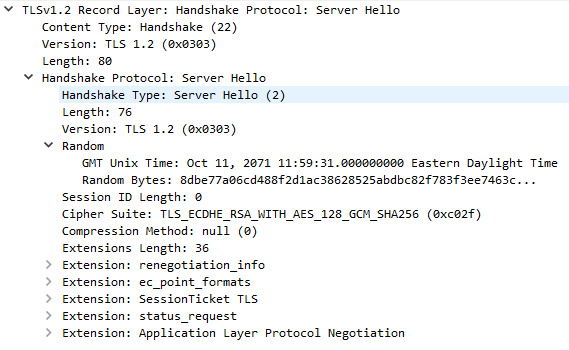
This message returns several important fields, beginning with the TLS version to be used, usually the highest version supported by both client and server. It also includes the server time (not sure why example.com is so off!) and 28 random bytes for use later.
The server also makes a cipher suite selection from the list chosen by the client. This should be the strongest suite supported by both. In our case, the server has chosen TLS_ECDHE_RSA_WITH_AES_128_GCM_SHA256, indicating the following: * Key Exchange: Elliptic curve diffie-hellman, signed with RSA * Encryption: AES in GCM mode with 128 bit keys * MAC: SHA256
Certificate
After the ServerHello, the server will send a certificate chain to the client if applicable.
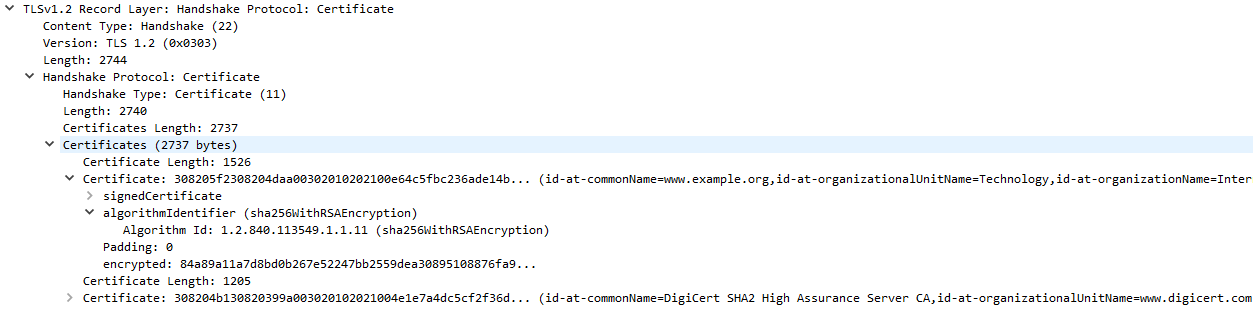
Each certificate comes with information about domains it supports, who it was issued by, and the time period (start and end) of its validity.
The certificate chain is a list of certificates beginning with the TLS certificate for the current domain, and ending in a root certificate that is built-in to the web browser. Each certificate is signed by the certificate above it in the chain, and it is this chain that the client validates to verify the server.
In our case, example.com has a certificate issued by “DigiCert SHA2 High Assurance”, which in turn is issued by the root certificate “DigiCert High Assurance EV Root CA.” On Windows, you can view the list of root certificates on your system with certmgr.msc
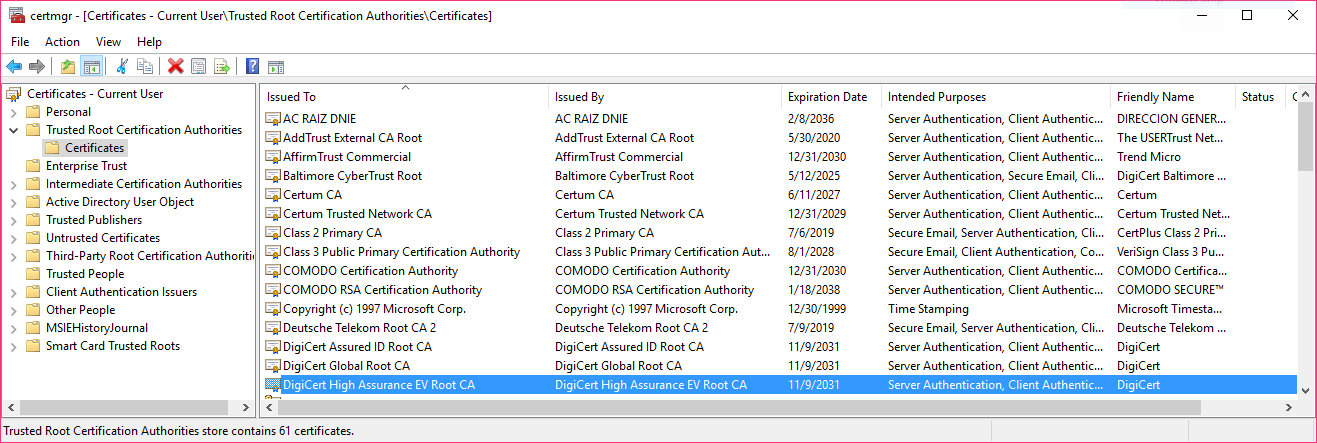
We can see the DigiCert High Assurance EV Root CA in our store, along with several other DigiCert certificates. OSX allows you to see root certificates using the “Keychain Access” program, where they are listed under “System Roots”
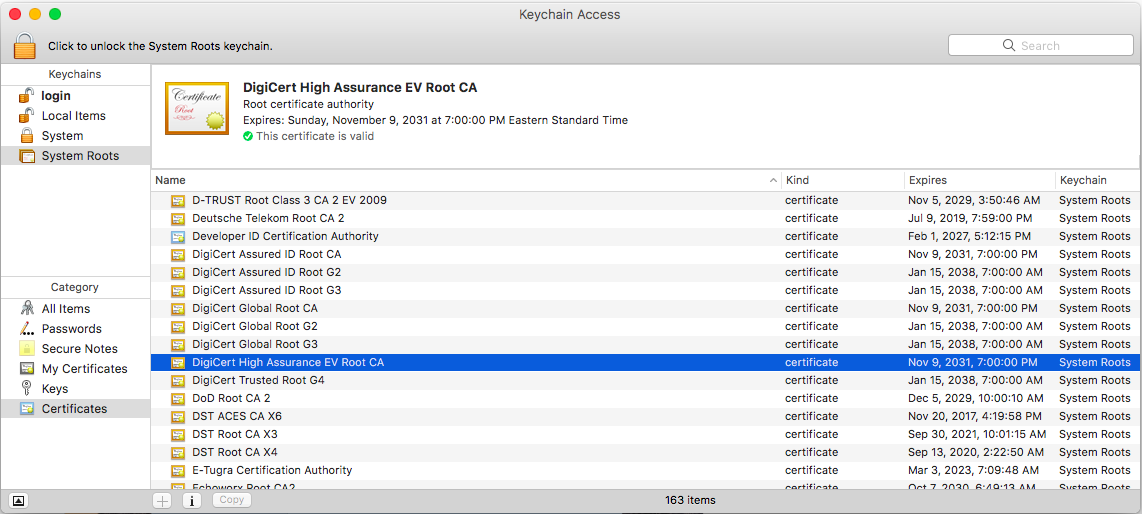
In general, browsers will defer to the operating system root certificates as the central store for their validation. One notable exception is Firefox, which uses its own certificate store and ignores system root certificates by default.
Root CA certificates are implicitly trusted by every system they’re included on. An attacker who manages to control their private key could impersonate any website without raising any red flags, so it’s important that the certificate authorities keep them safe (but that doesn’t always happen).
Optional: Certificate Status (OCSP)
One increasingly common extension is the Online Certificate Status Protocol (OCSP), used for certificate revocations. OCSP servers can be consulted by clients to check if the server certificate has been revoked, which helps solve a critical problem with TLS certificates. Servers response to certificate requests by issuing a signed response from the CA with a status code indicating whether or not the certificate is valid.
Prior to wide deployment of OCSP, TLS vendors shipped certificate revocation lists (CRLs) that contained serial numbers of revoked certificates.
To reduce load, servers often cache the OCSP response and send it as a Certificate Status TLS message (OCSP stapling). This helps reduce load on the OCSP system and protects attackers from analyzing OCSP requests to determine client browsing habits. The server will send this cached message in response to a status_request extension in the ClientHello message.
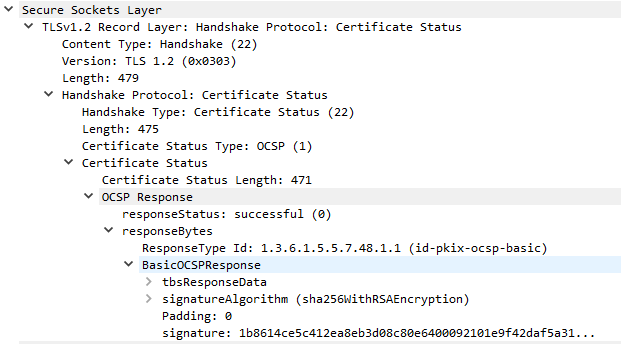
Each OCSP ticket is signed by a trusted OCSP server. The response itself consists of a responseStatus and optional responseBytes with additional information.
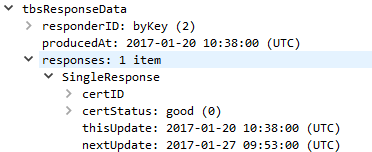
In our case, the OCSP ticket is valid and cached for 7 days (1/20 to 1/27). The server itself is responsible for refreshing its OCSP ticket at that time.
ServerKeyExchange
For DHE key-exchanges (DHE_DSS, DHE_RSA, and DH_anon), the server will use a ServerKeyExchange message to specify the parameters for the algorithm.
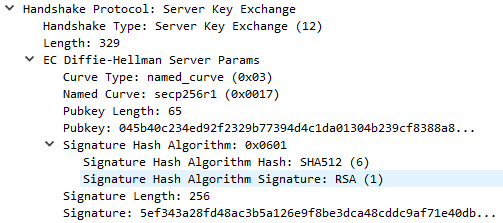
The server has specified a named_curve curve type using the secp256r1 elliptic curve (also known as P-256 or prime256v1). This is a public NIST standard curve. With knowledge of the curve to be used, both the server and client will know the crucial $p$ and $G$ values for ECDHE. For secp256r1, these are defined by NIST as:
p = FFFFFFFF 00000001 00000000 00000000 00000000 FFFFFFFF FFFFFFFF FFFFFFFF

G = 03 6B17D1F2 E12C4247 F8BCE6E5 63A440F2 77037D81 2DEB33A0 F4A13945 D898C296
The server will choose a random private key and compute $a*G$ as its public key. In addition to this it also signs the data with its private key - signing SHA256(client_random + server_random + server_params)
Server Hello Done
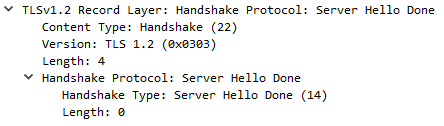
This short message from the server tells the client it’s done sending information. Nothing more.
ClientKeyExchange
Now, the client must send its own ephemeral public key (for DH).
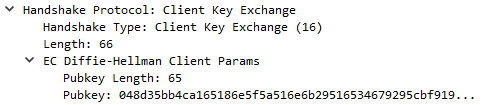
This is calculated by generating a random private key $b$ and from there calculating $b*G$ as its public key.
Completing the Key Exchange
Now that the client has $a*G$ and the server $b*G$, both can calculate the final secret value $a*b*G$ with their own private keys. This is known as the pre-master secret. The key detail here is that calculating $a*b*G$ from $a*G$ and $b*G$ alone is computationally difficult.
We just have one final step to convert our pre-master secret into the final master secret. We will use the random bytes generated by the client and server earlier along with our chosen psuedo-random function. For us, that was SHA-256.
master_secret = PRF(pre_master_secret, "master secret", client_random + server_random)[0..47]
The TLS 1.2 spec defines the PRF as PRF(secret, label, seed) which expands to P_SHA256(secret, label + seed). The label is the literal ASCII string “master secret” without any null terminator. This expands to the following definition:
P_sha256(secret, seed) = HMAC_sha256(secret, A(1) + seed) +
                         HMAC_sha256(secret, A(2) + seed) +
                         HMAC_sha256(secret, A(3) + seed) +
                         ...
where A(x) is defined recursively as
A(0) = seed
A(x) = HMAC_sha256(secret, A(x-1))
The result of the PRF is the final key that will be used for the bulk of the crypto in our application. We only want 48 bytes here, so we would need 2 rounds of SHA-256 and would discard the extra data.
Client ChangeCipherSpec
The final unencrypted message sent by the client will be a ChangeCipherSpec message, which indicates that all following messages will be encrypted.

Client Finished, Server ChangeCipherSpec, and Server Finished
Immediately after sending a ChangeCipherSpec message, the client will send an encrypted Handshake Finished message to ensure the server is able to understand the agreed-upon encryption. The message will contain a hash of all previous handshake messages, along with the string “client finished”. This is very important because it verifies that no part of the handshake has been tampered with by an attacker. It also includes the random bytes that were sent by the client and server, protecting it from replay attacks where the attacker pretends to be one of the parties.
Once received by the server, the server will acknowledge with its own ChangeCipherSpec message, followed immediately by its own Finished message verifying the contents of the handshake.
Note: if you have been following along in Wireshark, there appears to be a bug with Client/Server Finish messages when using AES_GCM that mislabels them.
Application Data
Finally, we can begin to transmit encrypted data! It may seem like a lot of work, but that is soon to pay off. The only remaining step is to discuss how the data is encrypted with AES_GCM, an AEAD cipher.
First, we generate a MAC, key, and IV for both the client and the server using our master secret and the PRF definition from earlier.
key_data = PRF(master_secret, "key expansion", server_random + client_random);
Since we are using 128-bit AES with SHA-256, we’ll pull out the following key data:
// client_write_MAC_key = key_data[0..31]
// server_write_MAC_key = key_data[32..63]
client_write_key = key_data[64..79]
server_write_key = key_data[80..95]
client_write_IV = key_data[96..99]
server_write_IV = key_data[100..103]
For AEAD ciphers like GCM, we don’t need the MAC keys, but we offset them anyways. The client and server also get different keys to prevent a replay attack where a client message it looped back to it.
We also construct additional_data and an 8-byte nonce, both of which are sent with the encrypted data. In the past, it was thought that the nonce could be either random or just a simple session counter. However, recent research found many sites using random nonces for AES_GCM were vulnerable to nonce reuse attacks, so it’s best to just use an incrementing counter tied to the session.
additional_data = sequence_num + record_type + tls_version + length
nonce = <random_8_bytes>
Finally, we can encrypt our data with AES GCM!
encrypted = AES_GCM(client_write_key, client_write_IV+nonce, <DATA>, additional_data)
and the server can read it with
<DATA> = AES_GCM(client_write_key, client_write_IV+nonce, encrypted, additional_data)
Conclusion
 (source: More Privacy, Less Latency: Improved Handshakes in TLS version 1.3)
That’s all it takes to make a TLS 1.2 connection! Over the course of ~103ms, we established a bidirectional encrypted tunnel and sent a full HTTP request and response in only 2 round trips. Although we didn’t cover nearly everything in the full TLS 1.2 RFC, we hope you have a pretty good overview of how process functions - and how much work goes in behind the scenes to secure web traffic!
Sources
http://www.moserware.com/2009/06/first-few-milliseconds-of-https.html
https://tools.ietf.org/html/rfc5246
https://tools.ietf.org/html/rfc5288
http://www.secg.org/sec2-v2.pdf
https://vincent.bernat.im/en/blog/2011-ssl-perfect-forward-secrecy.html